Accidential Inspiration
I can’t really say that I was “inspired” to begin creating art in this way by some grand moment of clarity or creative insight. There was no intense shimmering image in my head of how these should look. No divine vision borne from a muse. Rather, it was an accidental moment of convenience and necessity.
It was a typically gorgeous Saturday afternoon in Sarasota, Florida circa 1990. I had spent a good part of it at Siesta Key taking in the sun, imbibing beer of a dubious quality and enjoying the “natural scenery” which was always abundant on the weekends. Midway through the afternoon a sudden and sobering realization came to me: I had a major project due for my sculpture class Monday.
Well, damn.

PANIC MAKES A PRETTY GOOD MUSE
I packed up and headed back to the campus desperately trying to think of something I could put together quickly as time was not my friend at this point. After ambling around the buildings generating zero ideas, I was drawn to the sounds of the woodworking shop. Diligent students were hard at work on their creations using a wide variety of tools, most of which I had no idea how to operate. Another dead end.
But then I noticed a large bin full of wood scraps. Crazy, twisted random shapes that were the negative throwaways of whatever was being cut. There it was…my project. Simply paint some of these things bright colors, stick them together with nails et la viola – art!
I asked a student if the scraps were up for grabs and he said absolutely – help myself to whatever I wanted from the bins. I picked out a variety of large and small pieces of wood in all kinds of shapes. I did a little cutting on a bandsaw to a few of the pieces, thankfully without losing any fingers this being my first time on a bandsaw. A quick trip to the hardware store for nails and spray paint and I was in business. Back at my apartment I created a composition that I was pretty happy with along with a couple of additional beers for inspiration. I did not overthink this composition as the afternoon sun was quickly fading. There was no time for precious iteration or experimentation.

SAWS, SHAPES + THE GREAT UNKNOWN
My grade for the project? An A+ for ingenuity and originality.
I still have this original piece. although my mother gave it a much-needed makeover with new paint/colors while she had it in her Naples home.
Today the process is pretty much the same although thankfully I can afford much better beer.
I use a Delta 28-180 56-1/8” Band Saw using a Vermont American 18 TPI blade and a Ryobi SC163US 16” Scroll Saw for my cutting. I have to point out that there is no sketch done beforehand. No guide or even a loose rendering of what I’m going to create. I simply put wood to blade and let my hands and eye curve and shape at random. It’s all improv.
Afterwards I assemble the shapes into two or three different compositions. Often I do not use all the pieces and will incorporate some from a previous cutting session. As before I do not labor over this part of it. Once a composition feels Right I stop. I used to do a sketch at this point to use as a guide (pre-iPhone) but now I simply take a photo.
PHYSICS + POWER DRILLS
The pieces are assembled in reverse, from the back using a mix of drywall and wood screws. Which is to say the pieces on the very top are attached to the layer directly below them, from the back. I refer to the photo from earlier since now I am deconstructing the piece one step at a time. At this stage I also have to be sure all the pieces will support whatever other piece is being attached to it. Guide holes are drilled for every assembly point so the wood doesn’t split when the screws are put in. This method continues until all the pieces are securely attached.

SOME DISASSEMBLY REQUIRED
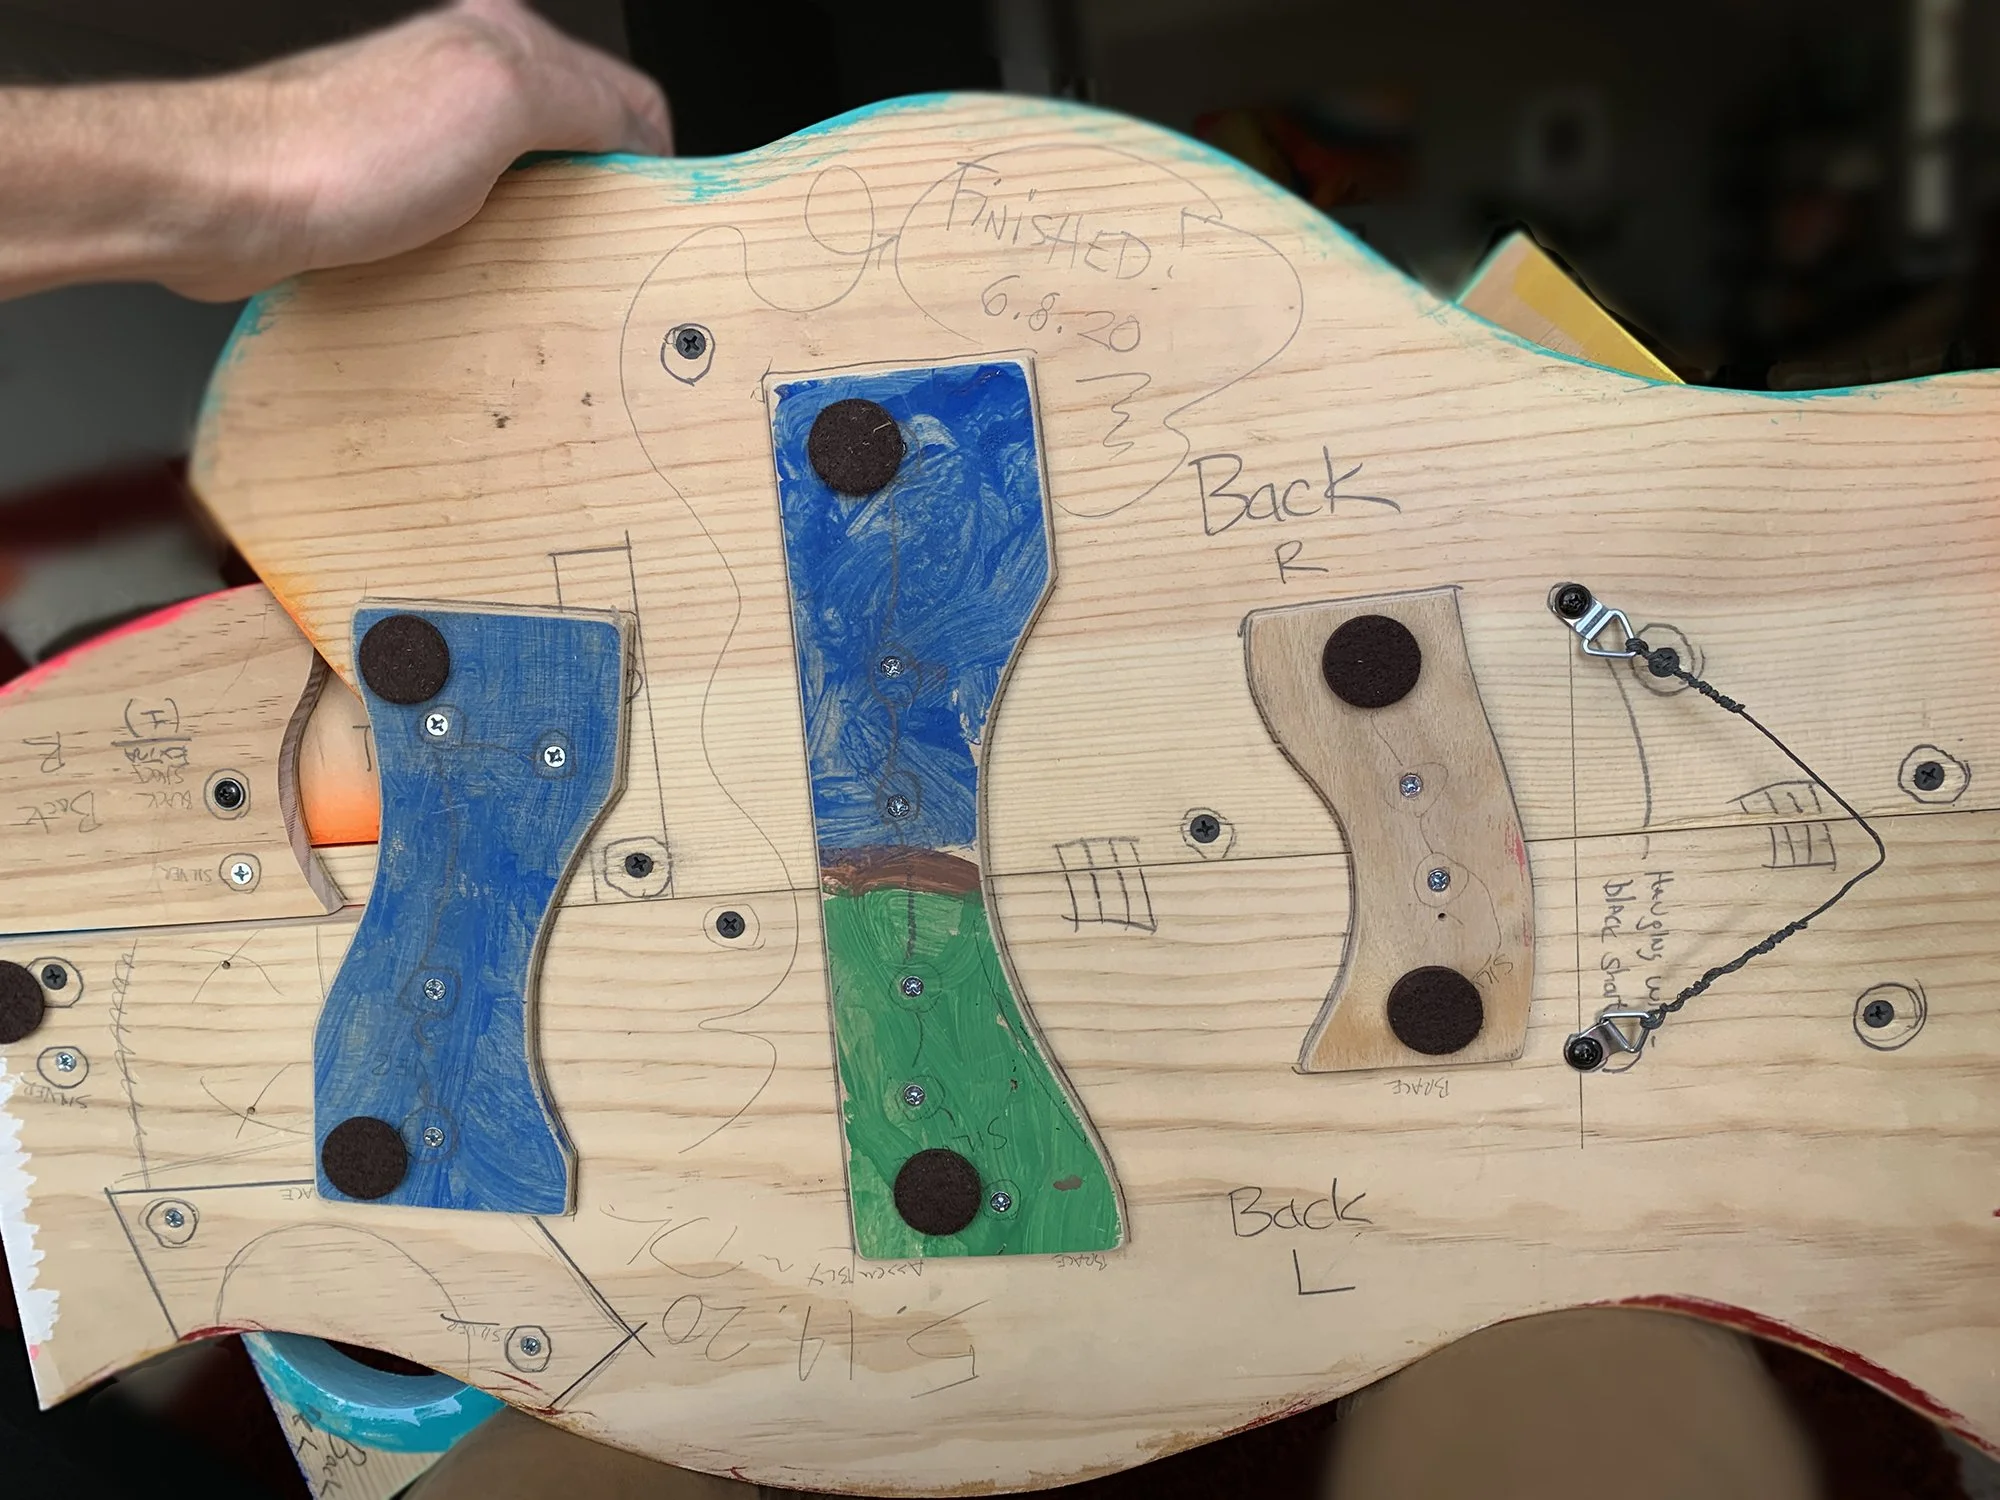
Once I have a composition assembled I balance it on the narrow side of a 2” x 4” to find the precise location of it’s center of gravity. Since the sculptures all hang from a single point this is crucial so the composition is correct once on a wall. I mark the center and where the screw-eyes will go. I write the date on the piece too – “assembled 12-12-14” and so forth.
Now I take the thing completely apart. But as I’m doing this I outline all the pieces on the back, add notes, circles and arrows in pencil – this all tells me how it goes back together once it’s painted which could be weeks from this point. A map of sorts. I also note which screws go where since they vary in size depending on the piece it’s holding.
SANDING - LOTS OF SANDING
Sanding takes a while. The pieces are often large and have multiple sides that will be visible: the top and however many sides it has. I use medium grit then fine grit paper to get the pieces very smooth, first with a WEN 4” x 36” belt sander, then by hand. Even if the color is going to be thick, a smooth surface makes the paint go on much easier. Once the dust is cleaned off the pieces, they get several sprayed coats of flat white primer. One last sanding with fine grit paper removes any spray texture. After a lot of prep, I finally have a smooth, clean canvas ready for color.
RHYTHM + HUES
Painting begins with the largest pieces first, as they will drive the hues of the smaller pieces later on. I use Liquitex acrylics, spray enamels, stains and sometimes “bargain bin” paints I find on sale at the home improvement stores. By this point I generally have a lead color in mind. With each piece I focus on the textures and nuances of the paint in addition to how the color. Each one I treat like a tiny little painting unto itself and I’m careful not to overwork or get too precious with them. Only once I get about 70% of the pieces done do I start referring to my photo to gauge creating complimentary color parings. Because of this random approach, much of what results are “happy accidents” (thanks Bob) of hue and texture.

GORGEOUS IMPERFECTIONS
Once every piece is painted, top and sides, I put everything back together, in reverse, just like in the beginning. It’s only during this act do I get a true sense of what the piece is going to look like. Often there are small, interesting shape configurations or color match-ups that don’t quite look “right’ in a formal artistic sense. But I’m okay with this. I enjoy this random, unexpected quality of the work and the surprises I get each time I finish.
Now I will add small details starting with the raised pieces and the dowels that sit on 18 gauge stem wire. While the wire is glued into the elevated piece, I will drill the holes in the supporting piece a tiny bit off-center. This creates a natural tension that keeps the pieces in place without the need for glue. And because they’re supported by wire, if they get knocked or pushed it’s very easy to repair vs. if they were on wood dowels.
Small bits like tiny raised circles or triangles are next. Finally I add some painted decorative elements like splatters or groups of tiny dots in organic, swirling paths across multiple pieces to pull different spaces of color and shape together.
Then I hang it on a wall and study it. Look and see what’s actually occurred in all the chaos and randomness.

YOU’VE MADE IT
If you’ve made it this far I raise my glass and thank you. Not many people are as interested in the “Artist’s Statement” as the work itself. I’ve tried to tell a good story in addition to getting into some of the nitty-gritty of how these come together.
As far as the sculptures themselves, I will say that they’re a reflection of my inner desire to express myself creatively and passionately, and embrace the randomness and unpredictability of life rather than try and control it. My muse seems ok with this, at least for now and I’m grateful for the inspiration. And I find that after every piece the universe gives me something for taking the risk. I always learn a new little trick of color or contour from the experience. Some extra nuance that I will put to use on the next piece. Even if I’m not aware I’m doing it.
Thanks again for sticking with me. I hope you enjoy looking at the work as much as I do creating it. Salut.